Wednesday, August 30, 2017

Sourdough Bread: Part 1 – Let’s Get This Started

Welcome to part one of a two part video series for how to make sourdough bread, with nothing more than flour and water. If you’re thinking I already did this before, well, we did, sort of. I did a multi-part series for this long ago, but it was horribly shot, confusing, and the results weren’t good. Other than that, it was fine.

Anyway, thanks to an amazing refresher course from Northwest Sourdough (which I highly recommend you check out, and subscribe to), I decided to take those videos down, and do an updated, 2-part recipe. There’s really nothing like homemade sourdough, and notwithstanding the time it takes for your starter to mature, it’s a very simple, and easy process.

The exact number of grams seen herein doesn’t really matter, as long as you’re using exactly the same amount of flour and water, by weight. I picked 70 grams, since it seemed like a nice amount to film, but the ratio is really the key. Same goes for the types of flour used. I like half spelt, and half bread flour, but this will work with pretty much any combination, including all wheat flour.

I never like to get too deep in the weeds when showing a technique, so if you do want all the Latin terms, and detailed explanations for what exactly is happening here, there are endless resources online. All I care about is that this works. After the second day, toss away half your mixture, feed with equal parts flour and water, wait for the microorganisms to do their 
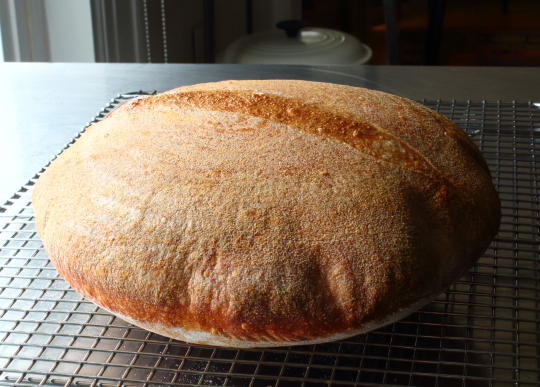
thing. Stay tuned for part two, or as I call it the good part, where we’re going to make a loaf of incredibly beautiful, tasty bread, and as always, enjoy!


Day 1: combined 70 g *water and 70 g flour
Day 2: add 70 g water and 70 g flour
Day 3: discard 140 g of your starter, and feed with 70 g water and 70 g flour
Day 4 until maybe Day 10: repeat the step above, every day, until your starter smells fruity, yeasty, and beautifully fermented.
- Test by seeing if the mixture doubles within 2 to 3 hours after feeding. 
-- All this is based on you keeping the mixture at 70°. If it’s cooler than that this will take longer, and if it’s warmer it may ferment too fast, although I’m not sure if that’s a problem.
Note: Once done, you can store in the fridge until needed. Most people recommend you feed it once a month or so.

* For best results, use bottled water, as chlorine can kill the yeast/bacteria.

Tuesday, August 29, 2017

Day Late and a Sour Dough Starter Short

Today's video has been pushed back until tomorrow, due to some extremely loud construction noise next door. While I'm happy our neighbors are getting a new driveway, I'm not happy I can't record the voice over for a new sour dough starter video. Thanks for your patience, and stay tuned! 


Friday, August 25, 2017

Rice-Ah-Roni – The San Francisco Treat?

While it’s true this great side dish was invented in The City, to call it “the San Francisco treat” is a bit of a stretch. Like I said in the video, the next time I see this served around here, will be the first. I’d say a Mission-style burrito is the real San Francisco treat. Which reminds me, I seriously need to do that video.

Regardless, if you like the stuff from the box, I think you’ll enjoy this, although without all that MSG, it will not be quite as savory. I guess we’re sacrificing a little less flavor for something that’s more healthful, at least according to me. I’ve stopped trying to convince people that eating lots of MSG is not a great idea; but as far as how it impacts one’s diet and carb cravings, I think the research is clear. In fact, forget the research, and just ask yourself why so many people are addicted to fast food.

It’s certainly not the quality, or appearance. Having said that, if you do want to get closer to the original, simply use a cheap, powdered chicken base to make your broth. That stuff is loaded with MSG, among other things, and may be preferable to many of you drive-thru junkies, he said judgmentally. Either way, I really do hope you give this a try soon. Enjoy!


Ingredients
3 tablespoons unsalted butter
1/2 cup finely diced onions
2/3 cup orzo pasta, or spaghetti broken into small pieces
1 1/3 cup white long grain rice
3 cups high-quality chicken broth
Spice blend:
1 1/2 teaspoon kosher salt, plus more if needed
1/8 teaspoon freshly ground black pepper
1/8 teaspoon coriander
1/8 teaspoon mustard powder
1/8 teaspoon celery salt
1/8 teaspoon paprika
1/8 teaspoon turmeric
1/8 teaspoon cayenne
1 tablespoon freshly chopped parsley

Tuesday, August 22, 2017

Horchata – No Tigers Were Harmed in the Making of this Drink

When it comes to delicious, unique, and refreshing summer drinks, it’s hard to beat horchata. There are countless ways to make this, but my preferred method is easy, relatively quick, and doesn’t require any tigernuts, whatever those are.

Apparently, that’s what the original Spanish version contained, among other things, but we’re doing a Mexican-style horchata, which is done with rice and almonds. The result is something that sort of looks like milk, but is much lighter, and pairs perfectly with all your favorite summer foods. I know, summer’s almost over, but not here in San Francisco, where our hottest weather is just ahead.

Depending on your tastes, you can alter the amount of sugar, as well as the ratio between rice and almonds, but what you can’t alter is the need to strain this before serving. Unless you like gritty drinks, you’ll want to pass this through a very, very five sieve, multiple layers of cheesecloth, or both. I hear a plain white, cotton t-shirt also works nicely, but I’ve never tried.

As you saw, I tested a nut milk bag, which allowed a little too much sediment through for my tastes, but regardless, do not skip this step. It’s especially important if you’re not leaving the mixture to sit overnight, since the particles won’t have as long to soften. Other than that, there’s not much that can go wrong, and I really do hope you give it a try soon. Enjoy!


Makes about 2 quarts of Horchata:
1 cup long-grain white rice
1/4 cup raw almonds
1 cinnamon stick, or 1 1/2 teaspoon ground cinnamon
2/3 cup white sugar
7 cups cold fresh water (4 cups to blend rice, 3 cups added after)
ground cinnamon to garnish, optional

Note: Once blended, let sit overnight before straining, if possible. This way the water has plenty of time to leach out the goodness from the rice and almonds. The four-hour method does work, but you don't get quite the same flavor. Along the same lines, many horchata "experts" actually prefer to not blend immediately, but rather let the mixture sit overnight to soften, before blending the next day. If you like how this comes out, feel free to experiment, and test for yourself.

Friday, August 18, 2017

Rigatoni al Segreto – Dinner and a Movie

This Rigatoni al Segreto recipe was the most closely guarded secret at Gino’s, one of New York City’s most famous Italian restaurants. It was as legendary, as their signature zebra-print wallpaper, and it won awards as the best red sauce in town. 

While there were rumors that the secret ingredient was butter, no one really knew for sure. Once the restaurant closed in 2010, the recipe got out, and indeed, the butter legend was confirmed. Having never been there, I was excited to try it, but there was a big problem. Actually, a small problem. The recipe called for just a half-tablespoon of butter. Regulars knew this couldn’t be right, and so the recipe remained a mystery. Was it a typo? Was the old chef just trolling people?

We may never have known; had it not been for a documentary called, “The Missing Ingredient.” It’s a great film, but despite the name, it’s not about the butter. However, there’s a scene near the end, where the old chef makes this pasta for the filmmaker, and it shows how much butter goes in.

He made a much larger amount than the published version, but I concluded that it was a typo, and should’ve been half a stick of butter. So, not only am I recommending that you make this delicious sauce, but I also really hope you checkout the movie soon (it’s on Netflix). Enjoy!


Ingredients for four small or two large portions:
4 tablespoons olive oil
1 cup diced onion
1 teaspoon salt, plus more to taste
2 or 3 cloves crushed garlic
a pinch of red pepper flakes (not in original recipe)
1 can (28 oz) San Marzano tomatoes, blended smooth
1/2 cup water to rinse out the can of tomatoes
Small handful of basil leaves, left whole or sliced just before adding
1 cup freshly grated Parmigiano-Reggiano (about 1.5 oz by weight), plus more to top
4 tablespoons butter, cubed
*8 ounces dry rigatoni

* This recipe probably makes enough sauce to coat 12 oz of pasta, but I like lots of sauce.

Tuesday, August 15, 2017

Building a Better Sausage Roll One Bite at a Time

I used to work for a caterer back in the 80’s, and sausage rolls were one of our signature appetizers. I loved them, the guests loved them, and so it never occurred to me that there was another, vastly superior, way to make them.

We used to bake the rolls first, and then cut them into bite-sized pieces, but years later I tried doing the reverse, and was stunned by how much better they were. The biggest challenge with sausage rolls, is avoiding undercooked dough, which is significantly easier when you bake the bite-size pieces, instead of the larger logs.

This method does take more work, but not that much more, and the crispier results more than make it worthwhile. Above and beyond the cut then bake method, the other way to make a better sausage roll, is to make your own sausage filling, as we’ve done here.

If time is tight, go ahead and just take some prepared sausage out of the casings,  and use that, but by making your own, not only do you get to season it anyway you want,  but you also know exactly what you’re eating,  which is not necessarily the case with store-bought sausage. Either way, whether for an indoor party, or outdoor picnic, I really hope you give these a try soon. Enjoy!


Ingredients for 16 Sausage Rolls:
1 pound ground pork
2 tablespoons finely minced onion
1 clove crushed garlic
1 1/4 teaspoon kosher salt, or to taste
1/2 teaspoon freshly ground black pepper
1/4 teaspoon ground coriander
1/8 teaspoon cayenne
1/8 teaspoon freshly grated nutmeg
1/4 teaspoon dried thyme
1 tablespoon minced fresh sage
1 tablespoon dry bread crumbs
1 sheet prepared puff pastry (I used Pepperidge Farm’s brand, which is probably the one you’ll find in the market)
1 large egg beaten with a teaspoon of water
sesame seeds to garnish

Monday, August 7, 2017

Oh Yeah, I’m on Vacation!

I must have been so excited about going over 2 million subscribers on YouTube that I completely forgot to publish the traditional, “Chef John is Vacation” post. 

Okay, that’s probably not the actual reason, but I did want to mention it. Hard to believe we have that many people following the channel, and that’s without the help of any Russian bots. Anyway, I’m on break this week as well, but will be back at it next week with two brand new videos. Stay tuned!

.